Few months ago I received a question, if it is possible to backup the Microsoft Teams chat. Or better – if it is possible to restore the backup of MS Teams. The answer is: “Yes, but …”
…but is little bit complicated. ;-) We need to start from the beginning.
UPDATE (3. Dec 2020): Several months of waiting is over. Today, VEEAM released the new version of Backup & Recovery for Microsoft Office 365 with Microsoft Teams support. If you want to backup your teams and channels, this solution is the best. :-) Get Community Edition plus a 30-day full trial license and try by yourself.
UPDATE (fix issue): Row 75. Replace ID of my test user account (f2637e45-0c9d-…) to $UsernameID
Introduction
My 1st idea was: just do the back up of the o365 group (Team in MS Teams) mailbox, restore all messages from the Conversation History\Teams chat to the local disk and with some “tricks” export these messages to the HMTL file. I wrote the script and all worked perfectly.
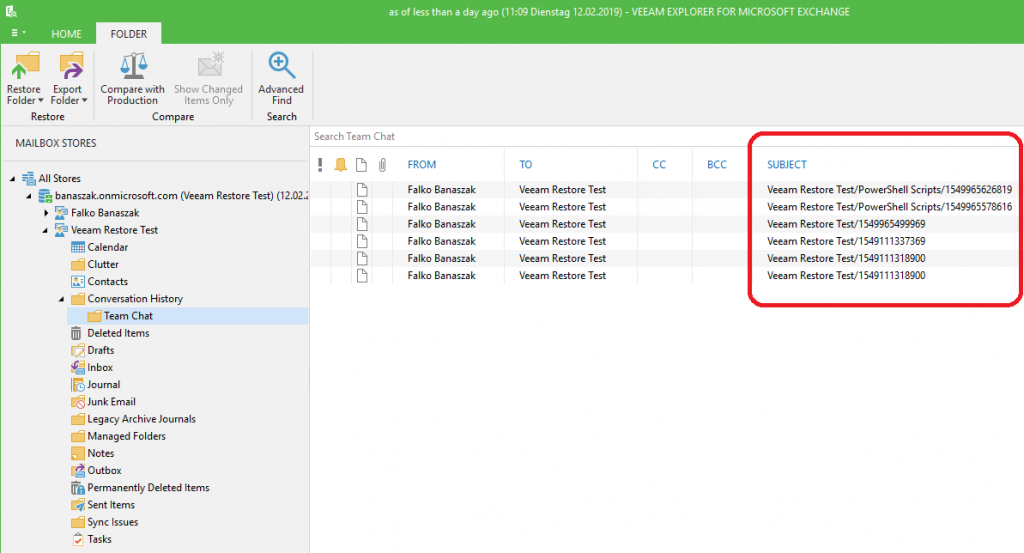
After next few hours I came up to very startling thing. “I do not have any information about Channel, where these messages were posted”. I started to google and I found the blog post from Falko Banaszak – Restore Microsoft Teams data with Veeam for Microsoft Office 365. Between Falko’s and my scenario was one difference. He had an information about channel in the Subject of the message.
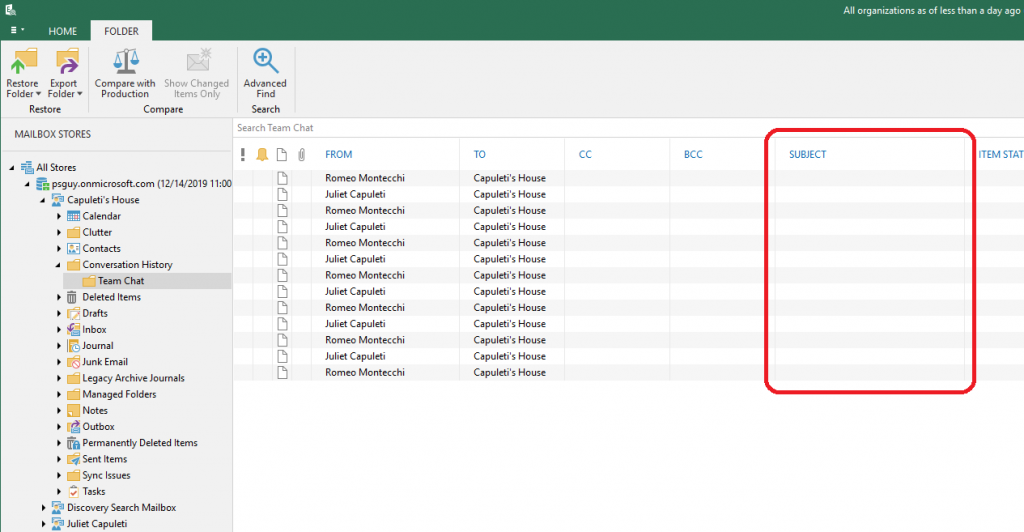
In my scenario this information was not presented in Subject.
I have no idea why has Microsoft removed this type of information from the Subject, but I received one comment to this: “Conversation history\Team Chat is “technical” (for internal system use) directory and that is why there is no official documentation (it is available only for administrators, e-discovery, etc.). For this reason, the structure of the directory could be changed without public attention. If you want to manage messages in TEAMS (backup/restore), it is better to use MS Graph API.”
Attention for Graph API
I started to learn something about Graph API.
“Microsoft Graph is the gateway to the data and intelligence in Microsoft 365. It provides an unified programmability model that you can use to access the tremendous amount of data in Office 365, Windows 10 and Enterprise Mobility + Security. Use the wealth of data in Microsoft Graph to build apps for organizations and consumers that interact with millions of users.“
Microsoft Graph exposes REST APIs and client libraries to access data on the following Microsoft 365 services:
- Office 365 services: Delve, Excel, Microsoft Bookings, Microsoft Teams, OneDrive, OneNote, Outlook/Exchange, Planner, and SharePoint
- Enterprise Mobility and Security services: Advanced Threat Analytics, Advanced Threat Protection, Azure Active Directory, Identity Manager, and Intune
- Windows 10 services: activities, devices, notifications
- Dynamics 365 Business Central
I found an information, that for managing messages in Teams, it is better to use the MS Graph API in beta version. If you want to use my solution, please remember that API is still in beta phase.
APIs under the /beta version in Microsoft Graph are subject to change. Use of these APIs in production applications is not supported.
Preparation of Graph API usage
If you want to use the MS Graph API you need to register the Azure Active Directory Application.
- Navigate to App Registrations in Azure and click on “New Registration” Azure Portal > Azure Active Directory > App Registration > New Application Registration
- Type the name of the Application and choose, who can use this application or access to API.
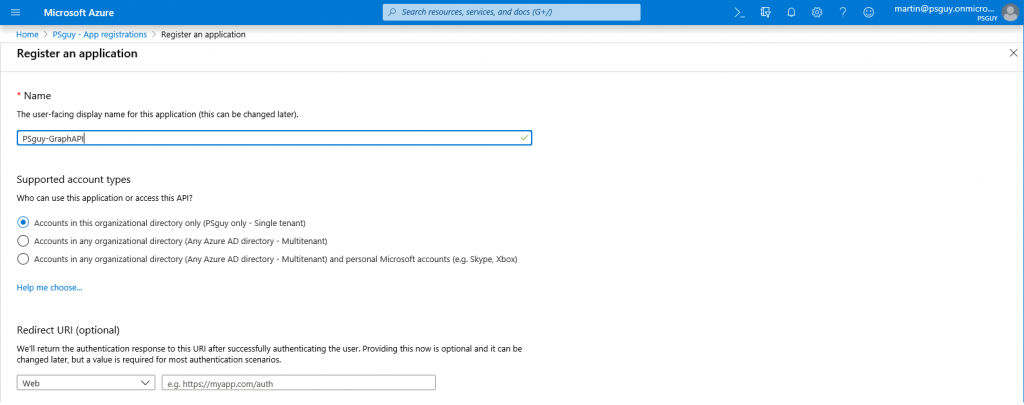
- Next you need to configure Redirect URI.
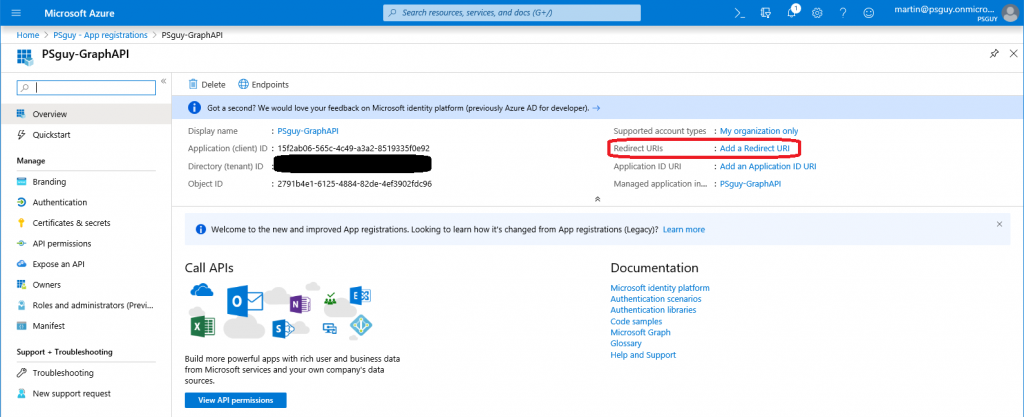
- Enter in ANY url as a redirect URI value. It DOES NOT have to even resolve! You could put http://localhost.

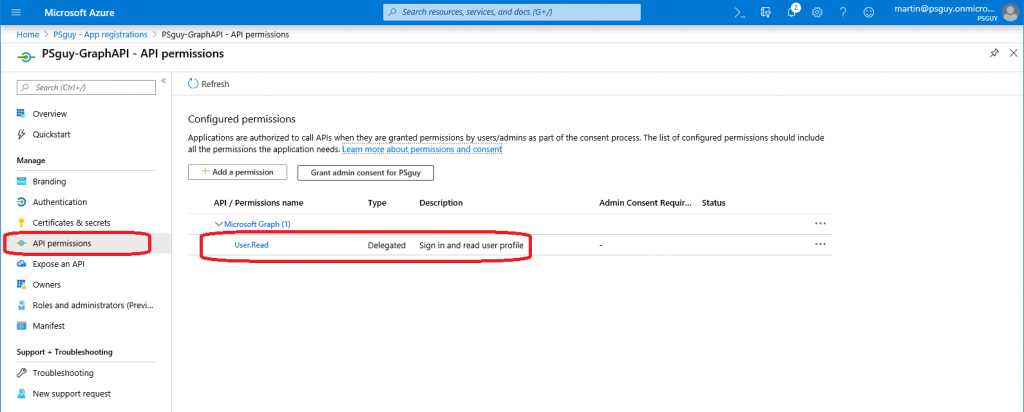
- Next you need to configure the permissions. Click on API permissions in your application. By default you will only have the User.Read permission assigned, that allows you to sign in and read the user profile.
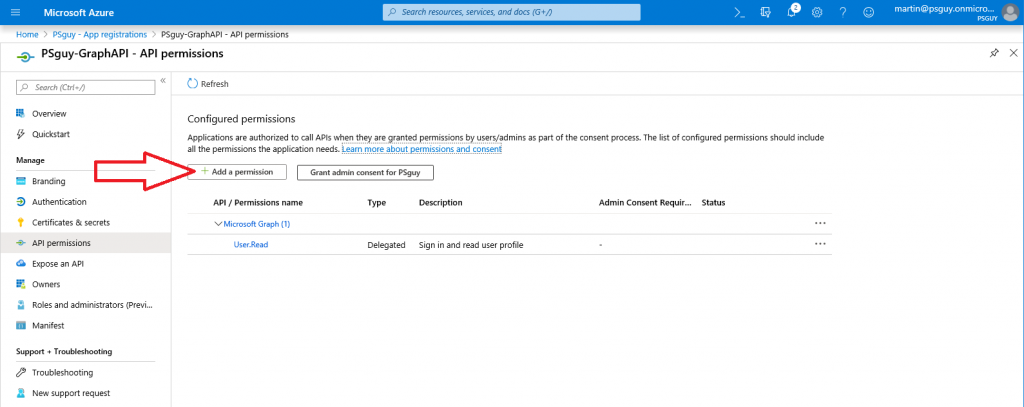
- To assign a new permission, click on the Add a permission button.
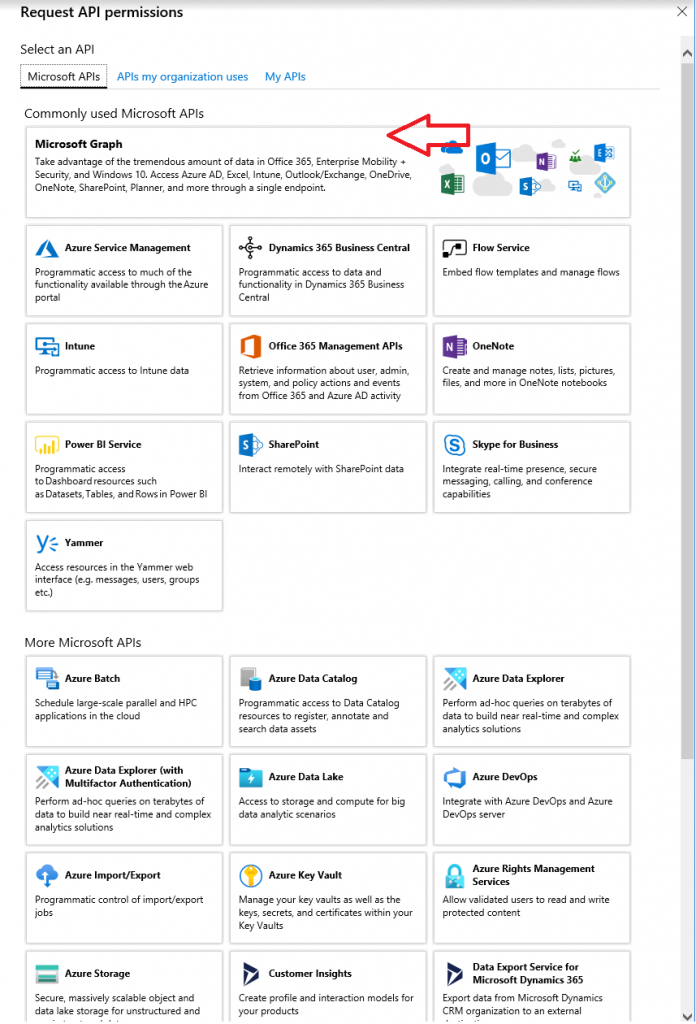
- Next click on Graph API.
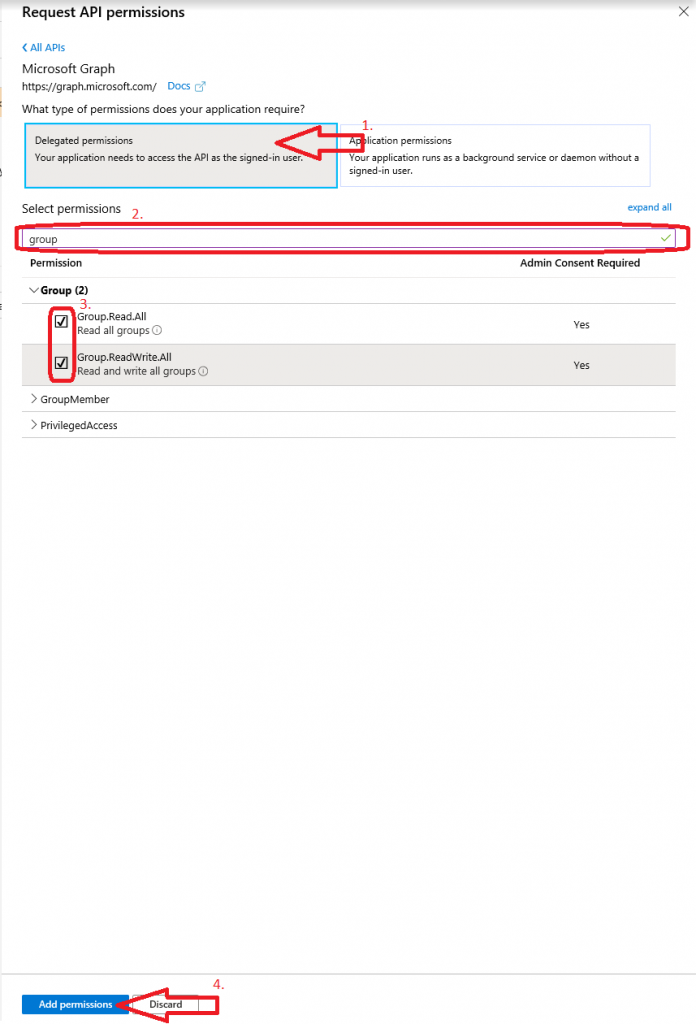
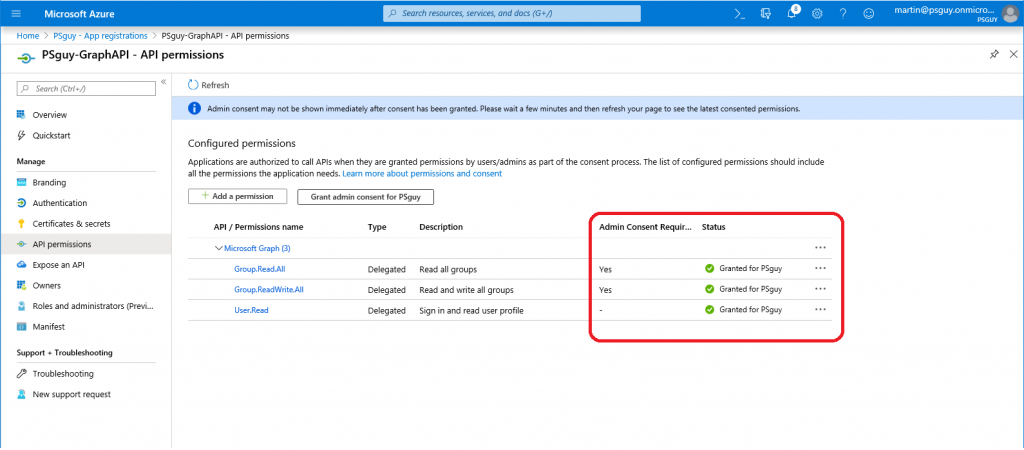
- Next choose Delegate permissions, and find the “Group” permission. Choose both of Group permission (Group.Read.All and Group.ReadWrite.All) and click Add permission button.
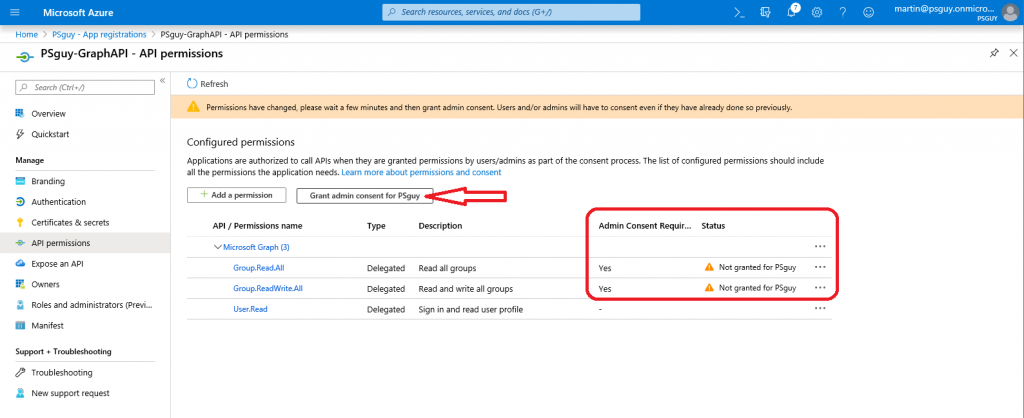
- Permissions have changed. Wait few minutes and then grant admin consent. Admin consent is required for both permissions.
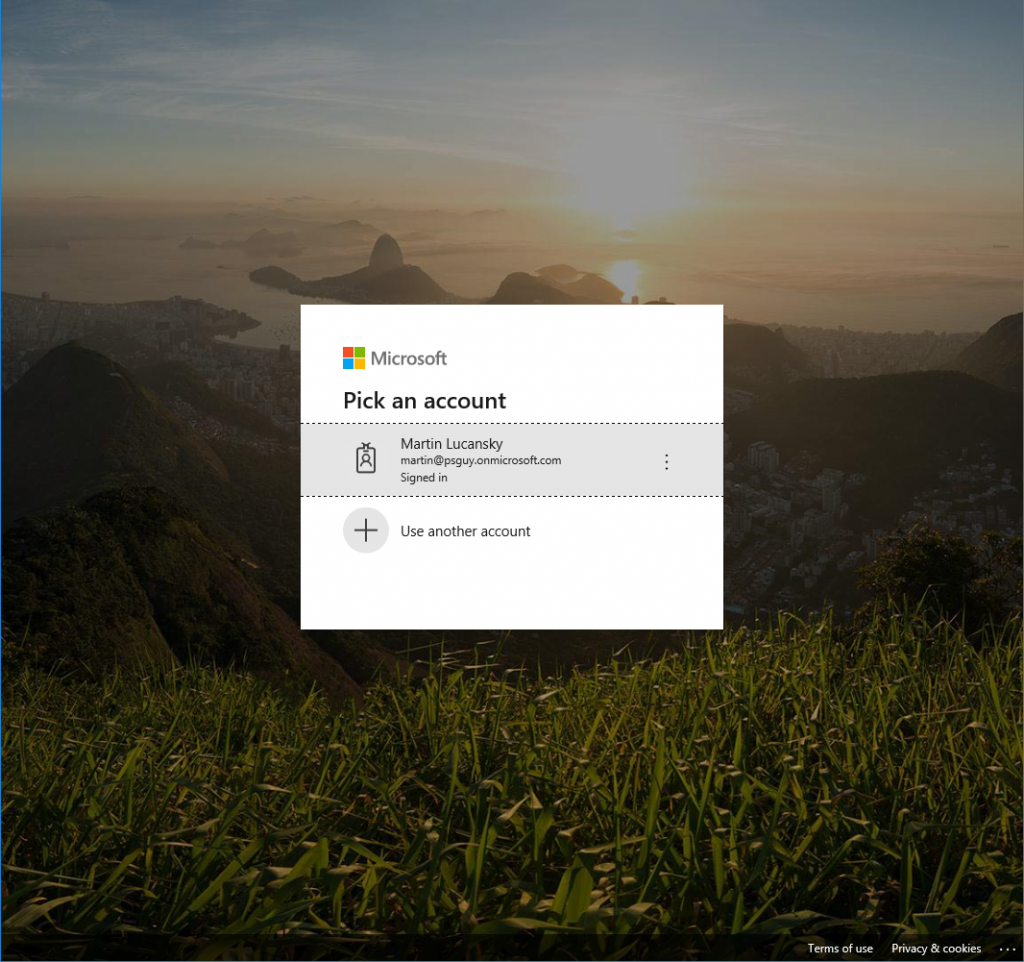
- Next you need to log in with admin account…
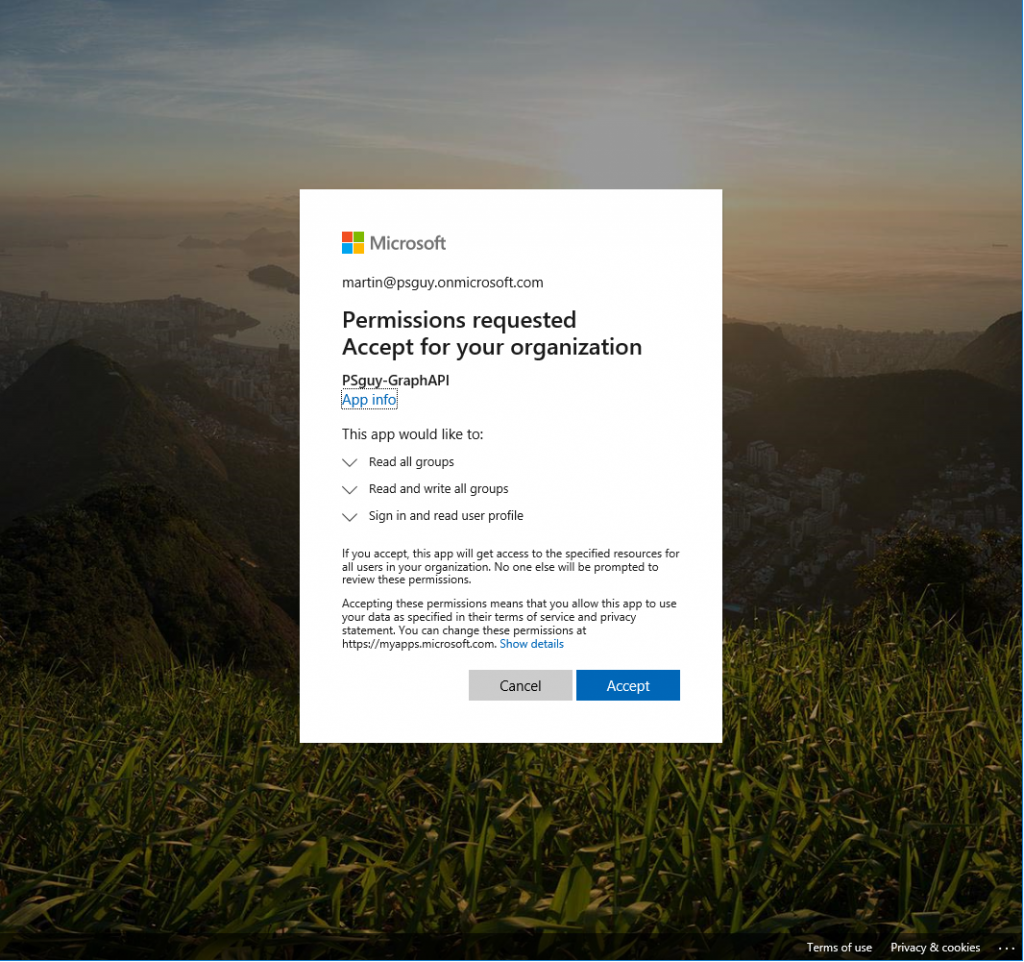
- …and accept requested permissions.
- Now you have also the admin consent.
- For our scenario you need to grant also Application type of permission – Directory.Read.All and Delegated type of permission – Directory.AccessAsUser.All. In step 8. just click on Applicaton permission and find the “Directory” permissions and the same with Delegated permission. Next grant the Admin consent.
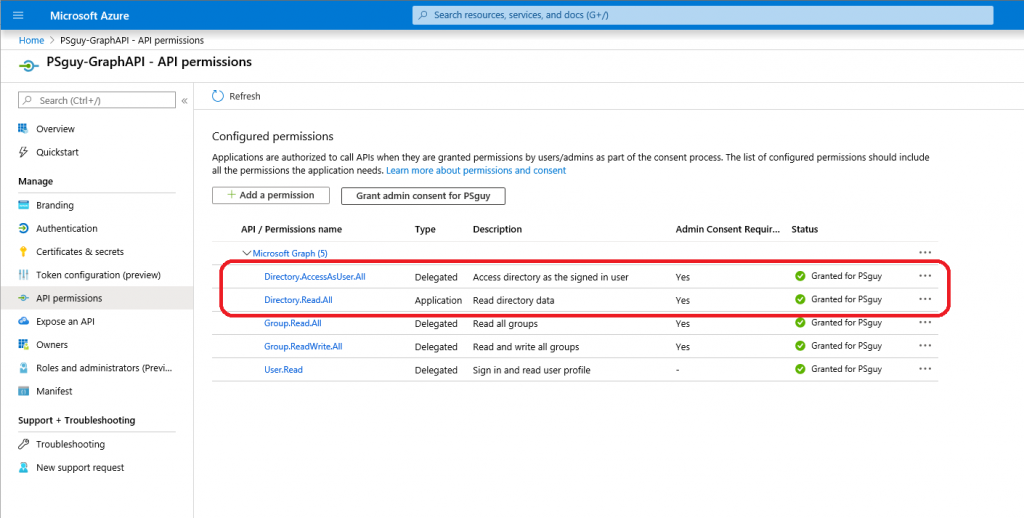
- Now you have all permissions that you need.
Authentication and Authorization
The Password grant type allows you to request a token for Delegated calls to the Graph API. In this script you will see that the client secret and the user password is hard coded in. In production environment I recommend to choose a secure option.
If you want to use password, you need also have (and use) the Client Secret.
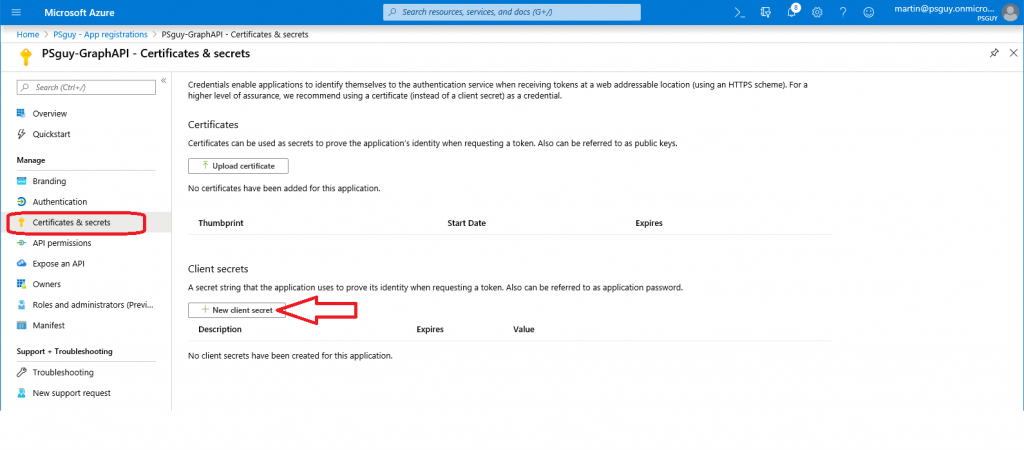
- Click on Certificates & secrets in your application and then click on New client secret.
- Type Description of the client secret and choose when the client secret expires.

- Copy the generated client secret. IMPORTANT: Once you click away, this client secret will never be able to be viewed again. Keep it safe and secure.

- Now you have everything what you need, if you want to backup and restore your Teams chat. :-)
Powershell script for read Teams messages through MS Graph API and export these messages to HTML format
When I configured all the permissions for using the Graph API, I started to write the script. :-) From this time it was not so hard. I just used some documentation from Microsoft sites.
For connecting to your MS Teams you need to set some variables:
$clientId = "client-id"
$tenantName = "tenant.onmicrosoft.com"
$clientSecret = <'your secret key'>
$resource = "https://graph.microsoft.com/"
$Username = "login@tenant.onmicrosoft.com"
$Password = "your-password"
$UsernameID = "objectid_of_username"
You can find values for these variables in Overview of your application.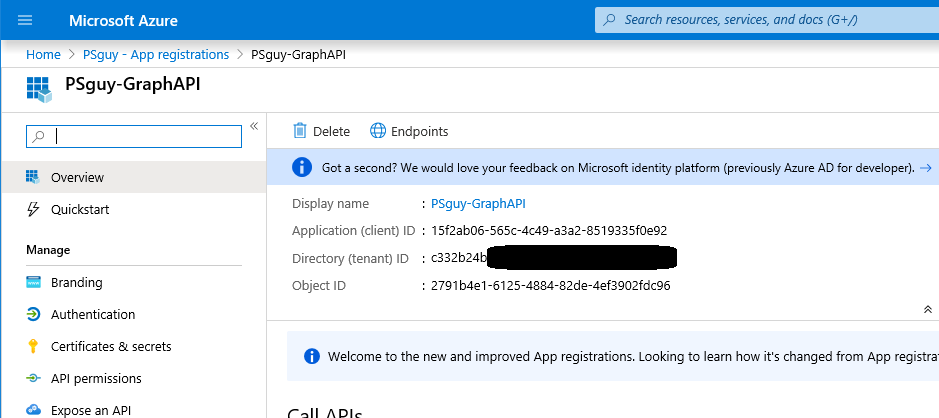
and also in User’s profile in Azure AD.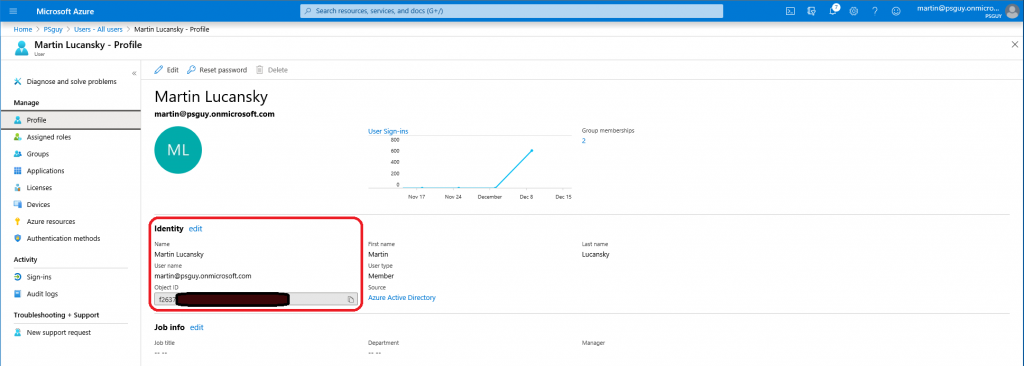
How to run the script
You can run script interactively: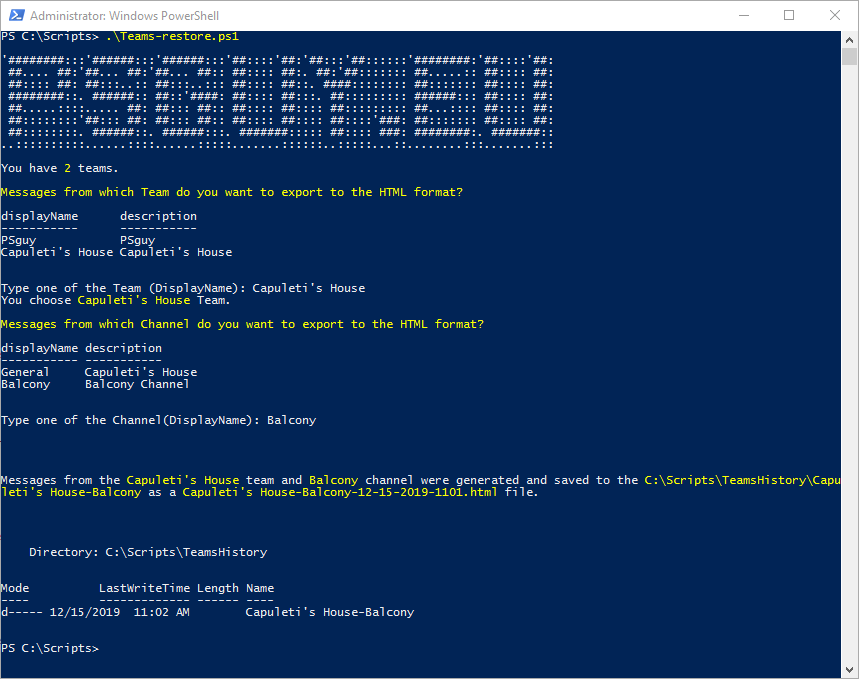
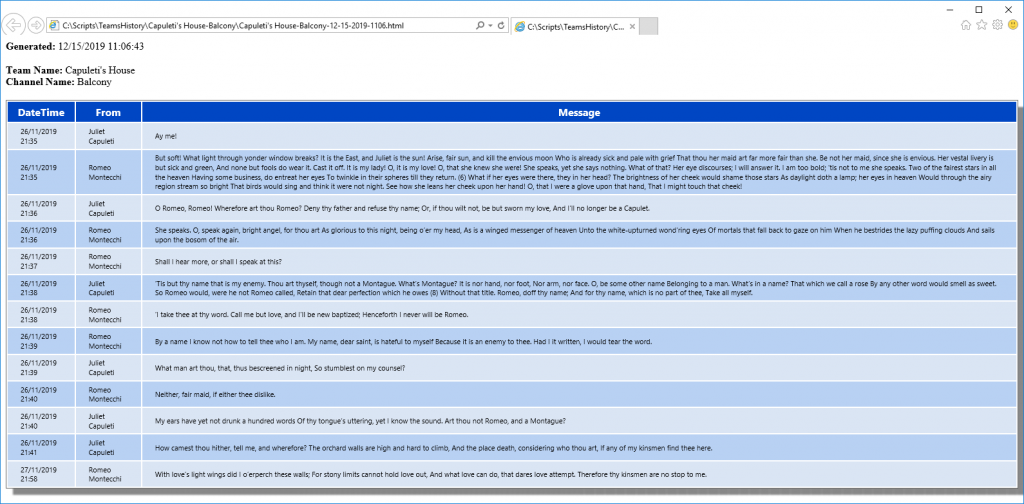
And the HTML export looks like this:
Script block and zip file with ps1
[CmdletBinding(DefaultParameterSetName='default')]
param
(
[Parameter(ParameterSetName='Channel')]
$Team,
[Parameter(Mandatory=$false,ParameterSetName='default')]
[Parameter(Mandatory=$true,ParameterSetName='Channel')]
$Channel
)
$scriptpath = $MyInvocation.MyCommand.Path
$dir = Split-Path $scriptpath
$Date = Get-Date -Format "MM-dd-yyyy-HHmm"
$clientId = "client-id"
$tenantName = "tenant.onmicrosoft.com"
$clientSecret = <'your secret key'>;
$resource = "https://graph.microsoft.com/"
$Username = "login@tenant.onmicrosoft.com"
$Password = "your-password"
$UsernameID = "objectid_of_username"
$ReqTokenBody = @{
Grant_Type = "Password"
client_Id = $clientID
Client_Secret = $clientSecret
Username = $Username
Password = $Password
Scope = "https://graph.microsoft.com/.default"
}
$TokenResponse = Invoke-RestMethod -Uri "https://login.microsoftonline.com/$TenantName/oauth2/v2.0/token" -Method POST -Body $ReqTokenBody
#Getting all Groups
$apiUrl = "https://graph.microsoft.com/beta/groups/"
$Data = Invoke-RestMethod -Headers @{Authorization = "Bearer $($Tokenresponse.access_token)"} -Uri $apiUrl -Method Get
$Groups = ($Data | Select-Object Value).Value
if ($Team -eq $NULL){
Write-Host "You have" -NoNewline
Write-Host " $($Groups.Count)" -ForegroundColor Yellow -NoNewline
Write-Host " teams."
Write-Host ""
Write-Host "Messages from which Team do you want to export to the HTML format?" -ForegroundColor Yellow
$Groups | FT DisplayName,Description
$Team = Read-Host "Type one of the Team (DisplayName)"
}
$TeamID = ($Groups | Where-Object {$_.displayname -eq "$($Team)"}).id
$apiUrl = "https://graph.microsoft.com/v1.0/teams/$TeamID/Channels"
$Data = Invoke-RestMethod -Headers @{Authorization = "Bearer $($Tokenresponse.access_token)"} -Uri $apiUrl -Method Get
if ($Channel -eq $NULL){
Write-Host "You choose" -NoNewline
Write-Host " $($Team)" -ForegroundColor Yellow -NoNewline
Write-Host " Team."
Write-Host ""
$Channels = ($Data | Select-Object Value).Value
Write-Host "Messages from which Channel do you want to export to the HTML format?" -ForegroundColor Yellow
$Channels | FT DisplayName,Description
$Channel = Read-Host "Type one of the Channel(DisplayName)"
}
$ChannelID = (($Data | Select-Object Value).Value | Where-Object {$_.displayName -eq "$($Channel)"}).ID
$apiUrl = "https://graph.microsoft.com/beta/groups/$TeamID/members"
$Data = Invoke-RestMethod -Headers @{Authorization = "Bearer $($Tokenresponse.access_token)"} -Uri $apiUrl -Method Get
$UsersIDs = ($Data | Select-Object Value).Value.ID
# Join $UsernameID to $TeamID if it is not a member
if ($UsersIDs -notcontains $UsernameID){
$apiUrl = "https://graph.microsoft.com/beta/groups/$TeamID/members/`$ref"
$body = @"
{
"@odata.id": "https://graph.microsoft.com/beta/directoryObjects/$UsernameID"
}
"@
$Data = Invoke-RestMethod -Headers @{Authorization = "Bearer $($Tokenresponse.access_token)"} -Uri $apiUrl -Method Post -ContentType 'application/json' -Body $body
Start-Sleep -Seconds 3
}
#messages from channel
$apiUrl = "https://graph.microsoft.com/beta/teams/$TeamID/channels/$ChannelID/messages"
$Data = Invoke-RestMethod -Headers @{Authorization = "Bearer $($Tokenresponse.access_token)"} -Uri $apiUrl -Method Get
$Messages = ($Data | Select-Object Value).Value
$mess = $Messages | Select-Object @{Name = 'DateTime'; Expression = {Get-Date -Date (($_).createdDateTime) -Format 'dd/MM/yyyy HH:mm'}}, @{Name = 'From'; Expression = {((($_).from).user).displayName}}, @{Name = 'Message'; Expression = {(($_).body).content -replace '&lt;.*?&gt;',''}} | Sort-Object DateTime
$Header = @"
<style>
h1, h5, th { text-align: center; }
table { margin: auto; font-family: Segoe UI; box-shadow: 10px 10px 5px #888; border: thin ridge grey; }
th { background: #0046c3; color: #fff; max-width: 400px; padding: 5px 10px; }
td { font-size: 11px; padding: 5px 20px; color: #000; }
tr { background: #b8d1f3; }
tr:nth-child(even) { background: #dae5f4; }
tr:nth-child(odd) { background: #b8d1f3; }
</style>
"@
$body = "<body><b>Generated:</b> $(Get-Date)
<b>Team Name:</b> $($Team)
<b>Channel Name:</b> $($Channel)
"
$body = $body + "</head>"
$messhtml = $Mess | ConvertTo-Html -Body $body -Head $Header
$Export = "$dir\TeamsHistory\$Team-$Channel"
New-Item -ItemType Directory -Path $Export -ErrorAction Ignore
$messhtml | Out-File $Export\$Team-$Channel-$Date.html
# Remove $UsernameID if it should not be a member of $TeamID
if ($UsersIDs -notcontains $UsernameID){
$apiUrl = "https://graph.microsoft.com/beta/groups/$TeamID/members/$UsernameID/`$ref"
$Data = Invoke-RestMethod -Headers @{Authorization = "Bearer $($Tokenresponse.access_token)"} -Uri $apiUrl -Method Delete
}
Write-Host "
"
Write-Host "Messages from the" -NoNewline
Write-Host " $($Team)" -NoNewline -ForegroundColor Yellow
Write-Host " team and" -NoNewline
Write-Host " $($Channel)" -NoNewline -ForegroundColor Yellow
Write-Host " channel were generated and saved to the" -NoNewline
Write-Host " $($Export)" -NoNewline -ForegroundColor Yellow
Write-Host " as a" -NoNewline
Write-Host " $($Team)-$($Channel)-$($Date).html" -NoNewline -ForegroundColor Yellow
Write-Host " file."
Write-Host "
"
Useful documentation
Use the Microsoft Graph API to work with Microsoft Teams
Microsoft Graph beta endpoint reference
Conclusion
I hope this blog post will help you to save your messages from MS Teams and read it in a reasonable way once you will need them to be restored. If you have any questions, feel free to contact me via twitter or LinkedIn.

